Operating Manual
This is the manual that is found in the "INFO" section of the SNOR Device app. We strongly suggest reading through the "Operating Manual" before starting using SNOR. Knowing what to do and when to do it will greatly enhance your results because you will not be wasting the first sessions learning the software.
We have developed the SNOR Device (electronic muscle trainer) to eliminate your symptoms of snoring. To accomplish this goal, you will need to train the muscles of your soft palate. They are located deep inside your mouth cavity and they are directly responsible for snoring. Without using the SNOR Device, the training of those muscles is ineffective.
The training consists of periodic, intensive tension of the soft palate muscles. Those particular muscles can be trained and maximally activated only by one exercise – applying a sucking effort through a tube. The tube connects to the device from one end, while the other end goes into your mouth.
In order to reach the training goals quicker, SNOR sets a certain training pace by calculating an optimal exercise difficulty level. The device also demonstrates whether your soft palate muscles are working hard enough and whether you are performing the exercises correctly. The training course consists of 20 daily sessions. Each session takes 10 to 15 minutes to complete.
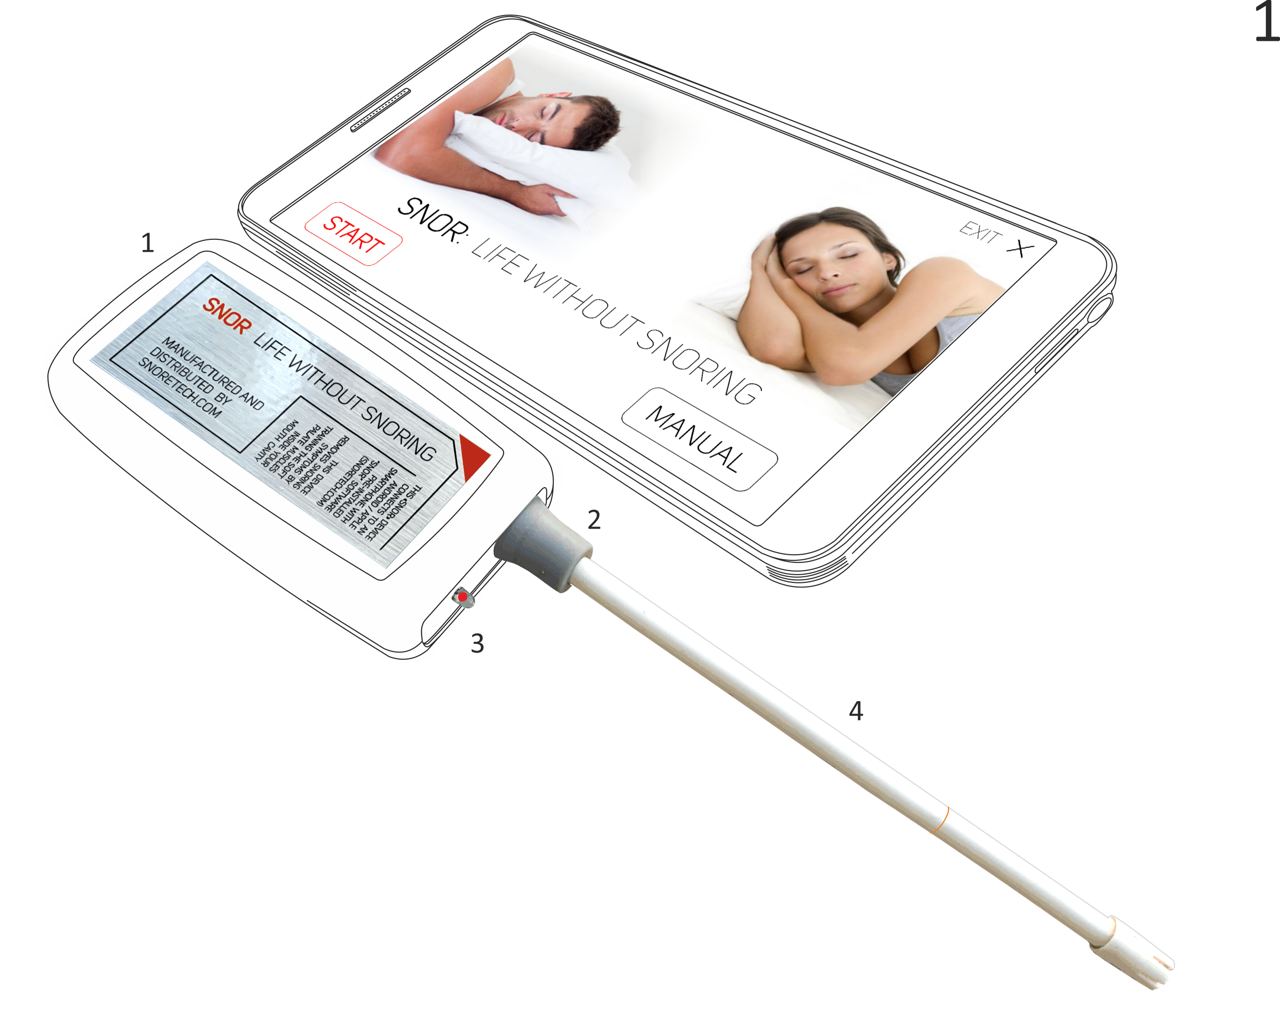
Image 1 shows the SNOR Device. The electronic components are housed inside the plastic body (enclosure) (1) of the Device. There are on the device enclosure: tube catch (2) and status LED light (3).
The plastic tube (4) is used when working with the device. One end of the tube inserts into the catch on the Device enclosure and the other end is positioned inside a mouth of a user. The tube features a marking where the lips of a user should be placed.
INSTRUCTIONS FOR USING THE SNOR DEVICE
Before working with the Device you should install the software/app on your smartphone. You can download it on Apple Store, Google Play or from www.snoretech.com.
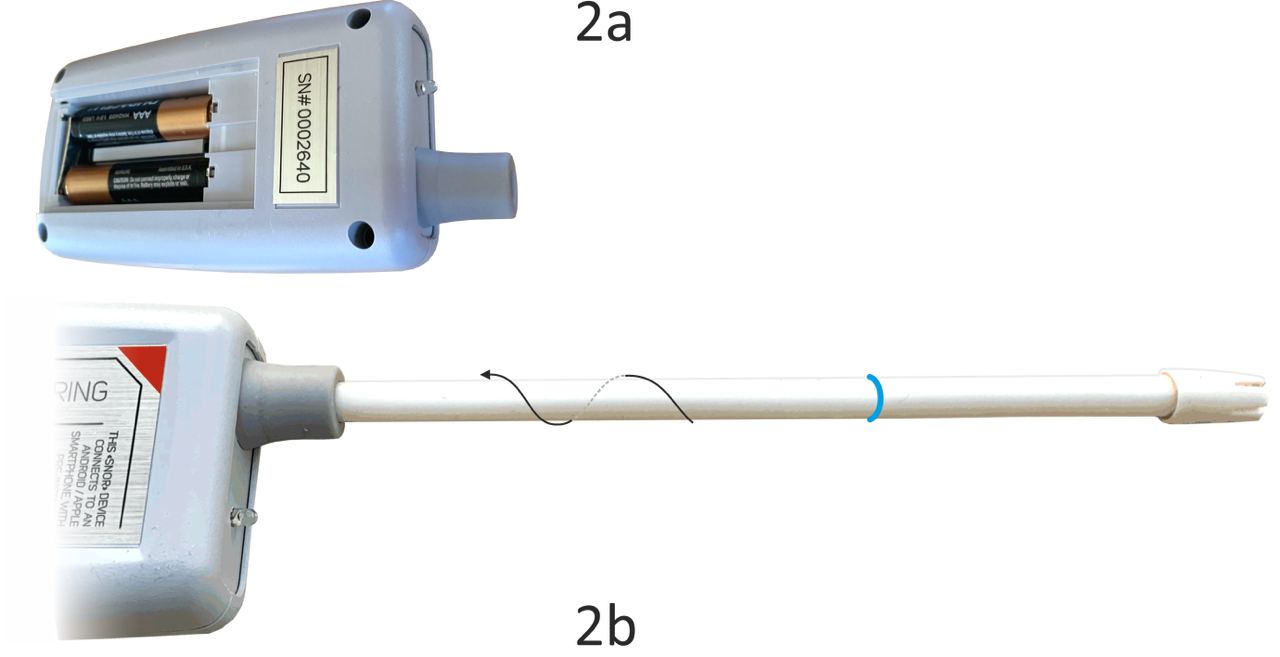
Unpack the “SNOR” Device, insert two AAA batteries into the Device (Image 2a). Immediately after starting the app, it will start searching for the device via Bluetooth. If Bluetooth is not enabled on the smartphone, the app will ask you to do so. A successful connection to the device will follow by blinking indicator light on the device (once per second) and a message on your smatrphone screen: "The gadget is connected".
If there is no connection, the message "Trying to connect to the gadget. Please wait ..." will appear repeatedly.
If there is no connection for 10 or more seconds, you should check the connection of the batteries and / or their quality and charge status..
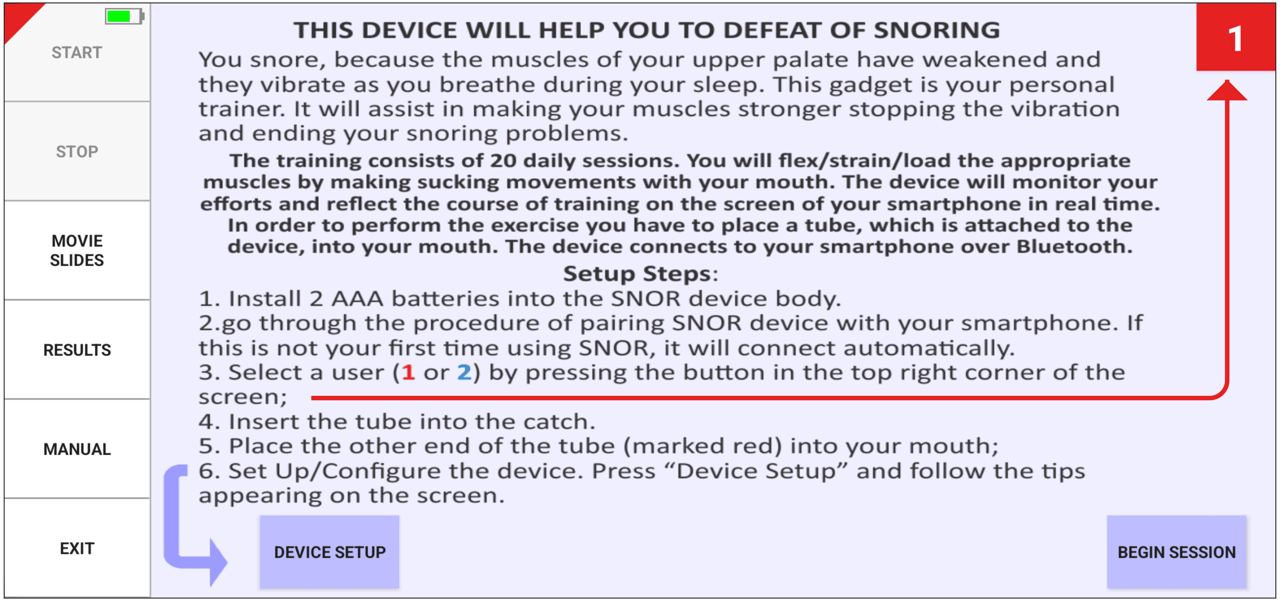
You are now ready to start working with the app by pressing the “START” button on the screen. Once you press the “START” button, the next screen will present you with a brief explanation of the Device purpose and the training procedure (Image 3).
Make sure you choose your “user number” if you are using a 2-user version of the Device. The results for each user get logged into the database separately.
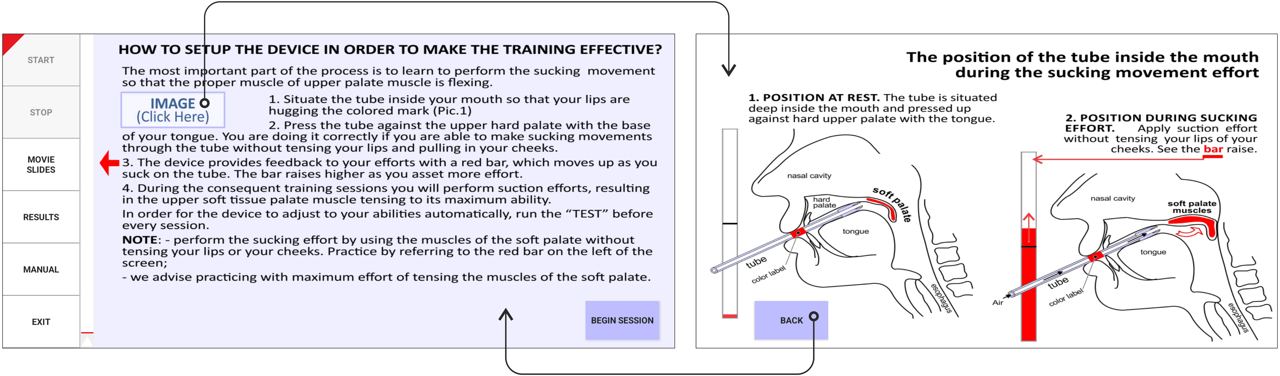
Press the button “DEVICE SETUP”. The setup window will open, showing the brief explanation of how to work with the Device. Specifically you will see a guide on how to correctly place the tube inside your mouth and how to activate and train your soft palate muscles (by performing the suction effort).
Insert the tube into the tube-catch located on the Device enclosure (Image 2b).
While setting up, keep in mind how the training procedure takes place. The method eliminates snoring by training the soft palate muscles. In order to activate those muscles, you must perform suction efforts through the tube without using your cheek and lip muscles. The instruction in the phone app are supported with drawings (Image 5).
Press the "BEGIN SESSION" button after which a window will open explaining the testing procedure (Image 6). The testing is mandatory, and it needs to be performed before the start of every training session. This procedure is required to evaluate the strength of your soft palate muscles. The data collected during the testing procedures is used by the device to automatically adjust the difficulty of the exercises based on your abilities. The strength of soft palate muscles can vary from one person to another in multiples of 8 to 10; therefore, something that is easy for one user can be extremely challenging or impossible for another. Therefore, the testing procedure (soft palate strength evaluation) is critical. Another important feature of the “TEST” option is that the test results are logged / saved into the app memory, and they demonstrate your progress as you go through the training course.
After pressing “BEGIN TEST” you will see a timer counting down to the start of the testing session (Image 7). The test screen features 3 vertical blue sections (Image 8) and you will hear the voice commands, informing you what you need to do and when you should do it. The voice will instruct you to make 3 sucking efforts through the tube during the testing procedure. Your goal is to suck in the air through the tube at your maximum ability when the orange graph runs across the blue sections of the screen. The height of the graph on the screen directly depends on how much you strain the muscles of the soft palate.
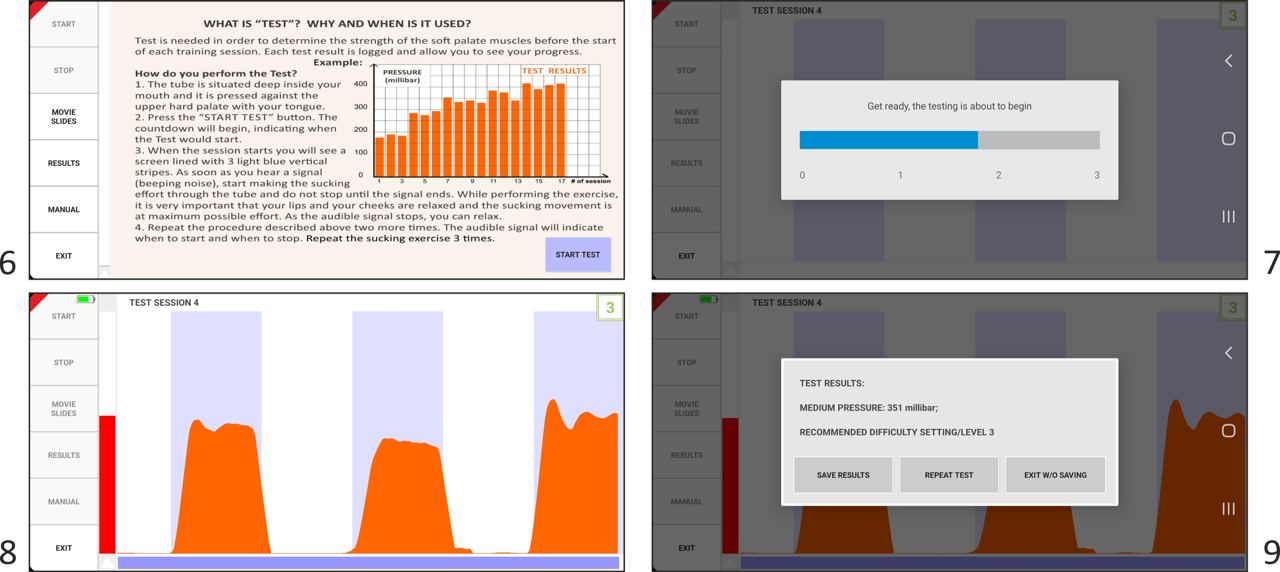
The testing procedure is complete when the “TEST RESULTS” window appears. “AVERAGE PRESSURE” corresponds to how much negative pressure (vacuum) you have created inside the tube by performing the suction effort during testing. Generally, the average pressure created during the testing procedure in the beginning of the course is within 50-150mb (millibar) range. After completing the training course, the pressure will be in the range of 250-350 mb.
“TEST RESULTS” screen also shows you the recommended level of difficulty for your current soft palate condition. The levels are presented as numbers (1, 2, or 3). The higher number corresponds to a higher exercise difficulty level. The test results can be saved/logged into the database by pressing the “SAVE RESULTS” button. You also have the option of repeating the testing procedure if you think that you can reach better results on second try. You can also reset the current testing result and exit the testing screen by pressing “EXIT WITHOUT SAVING” button.
After the testing procedure is complete, it is time to move on to the training session, which consists of two separate types of exercises. The first information window (Image 10) will explain the procedure of completing the “BARS” exercise. Press the “START EXERCISE” button to start the exercise. A new window will open (Image 11), featuring five blue vertical sections. Press the blinking “START” button in order to begin the exercise. Once the exercise starts, you will be prompted by the voice commands instructing you when to apply the sucking efforts through the tube and when to relax. You will have to apply effort five consecutive times during this exercise. The screen during the training exercise is shown on Image 12. Every one of your efforts is reflected on the screen in a form of a raising blue graph: the more effort you apply with your soft palate muscle, the higher the graph will peak. Your goal is to keep the blue graph above the red threshold line. The threshold level is set individually for every user based on the results of the testing procedure. A good analogy for the threshold line is the amount of weight you are lifting at the gym to make your muscles stronger.
After 5 soft palate muscle tensions of 5 seconds each the device will allow for rest. There will be a movie or a slideshow demonstrated on the screen (Image 13). Sample multimedia files (movies and images) are uploaded to your smartphone during the app installation; however, you are able to use your own video files from your smartphone / tablet or you can view any videos from YouTube if your device has online access. We will describe the procedure of choosing custom multimedia files later in this guide.

The resting period takes 20 seconds, although it can be interrupted by pressing the “CANCEL” button or can be extended by pressing “+” button at the top left of the screen. Every press of the “+” button extends the resting period by 10 seconds. The time until the rest period is over is shown in the top left corner of the screen.
Once the rest period is over the screen with the blue background sections will appear again and the training will continue (another cycle consisting of five soft palate muscle tensions). The threshold (minimal level of muscle tension) will be recalculated for every new exercise cycle, and it is set based on the results of the previous training cycle. This allows to track the change in your muscles conditions as you get tired during training.
 Once the “BARS” exercise is complete, the new informational screen will appear
which will outline the next exercise (Image 14). The exercise name is “MOVIE”
and its goal is to make you engage your soft palate muscles and keep them tense
for longer period. This motivates the muscles to grow faster due to the increase
of protein synthesis within muscle cells (myocytes).
Once the “BARS” exercise is complete, the new informational screen will appear
which will outline the next exercise (Image 14). The exercise name is “MOVIE”
and its goal is to make you engage your soft palate muscles and keep them tense
for longer period. This motivates the muscles to grow faster due to the increase
of protein synthesis within muscle cells (myocytes).
The multimedia stimulus plays a significant role in the “MOVIE” exercise. In the “MOVIE” exercise, you do not see the real-time graphical representation of how your muscles are performing (unlike in the previous, “BARS” exercise). You are watching a video or image slides; however, your ability to watch the media depends on whether your muscles are continuing to hold flexed tension. While you are tensing your muscles (high rate of suction through the tube), the movie / slides are shown on the screen. If you start losing the muscle tension, the screen goes blank. In order to “turn on” the screen, you have to resume the tension of the muscles to the appropriate level.
Prolonged muscle tension is an unaccustomed and tiresome exercise. We use the multimedia viewing as a stimulus that provokes your interest and does not let you give up as you get tire
Keep in mind that we cannot upload enough movies or images into your phone library due to the restrictions of the Apple Store and Google Apps on our application size. Therefore, we recommend you download several movies or image libraries, which you would use during your exercises with the SNOR device.
 To use the extra multimedia files there is a button “MOVIE SLIDES”. When you press it, it will allow you to browse your phone folders and set path to your media (Image 15).
First, you have to make a selection of whether you want to view a movie or slides/images. This is done by double tapping your selection with your finger. The next window will show you the path to the earlier selected file (if you are setting up for the first time the path would point to a stock video file that comes together with SNOR app). You can use “DELETE” button to remove any media file from the playlist. You can use the “ADD” button to add a new file. There is also “ONLINE”. The "ONLINE" option will only work when your smartphone is connected to the Internet to select a movie there.
After you choose a movie or a slideshow (the selected file will be highlighted in blue) you have to confirm your choice by pressing the “SELECT” button. When the media is selected you will automatically return to the “MOVIE” informational window (Image 14).
To start the session press the “START SESSION” button and you will be prompted to the next screen. Press the “START” button and you will see the graph starting from left to right (Image 16). As soon as the strength of the sucking effort through the tube (green graph line) reaches the threshold (blue, horizontal line shown on Image 16), the device will launch the chosen multimedia file automatically (Image 17). Depending on your efforts, the screen will turn on and turn off. To watch the movie/slides without interruptions you must constantly support the high level of tension of your soft palate muscles by forcefully applying the sucking effort through the tube.
 To perform the exercise correctly, follow the voice commands. For better control you can refer to the graphical representation of your soft palate muscles activity reflected by the vertical red line on the left of the screen (Image 17). You are also able to switch to the graph view by pressing the “GRAPH” button in the upper right corner of the screen. By pressing the “GRAPH” button you will see the full graph of your soft palate muscles activity (Image 18). You can go back to viewing the media by pressing the “MOVIE” button.
During this exercise, the period of the continuous soft palate muscle tension lasts 20 seconds, after which you are given a 20-second break to relax and to regain your strength. SNOR evaluates your efforts in real time, analyses the results, and sets the difficulty threshold for the next 20-second session based on the previously completed one.
The time left until the end of the session (in seconds) is shown in the top left corner of the screen.
You can prematurely end the “MOVIE” exercise from the graph view of the screen (“GRAPH” button), by pressing the “STOP” button and confirming your choice. The “MOVIE” exercise is considered complete as long as you have completed at least one 20-second exercise.
 Once the “MOVIE” exercise is over you will see the window that shows your current session results (Image 19). You will see the overall testing results as well as the results you have reached in each of two exercises. The colored vertical bars show the tension strength of your soft palate muscles during the “BARS” and “MOVIE” exercises. The red line shows the “effectiveness” of the session (% of time when the tension of your soft palate muscles was above set threshold).
This result can be saved as a JPEG image file by pressing “SAVE IN PICTURE FORMAT” button. The image will be saved and stored on your smartphone under “SNOR Files > Results” for the Android version of the software and under “SNOR > Albums” on Apple devices.
By pressing the button “END SESSION” the session ends and the results are saved in the database.
If you would like to review the results of the previous training sessions, press “HISTORY” button. The “HISTORY” screen will display the averages of all the complete sessions and testing results of both “BARS” and “MOVIE” exercises. This data makes it easy to review the success of the soft palate muscles training objectively (Image 20).
The graphs you see on the screen can be saved to your phone memory as an image in JPEG format (Storage/SNOR Files/ Results), by pressing “SAVE IN PICTURE FORMAT” button or you can save the results in a tabular format by pressing “SAVE AS NUMERICAL TABLE”.
The database is limited to 20 sessions. If you would like to start a new training course, you need to clear the database by pressing “DELETE ALL RESULTS”.
To exit the “History” window press “CLOSE WINDOW”.
 The SNOR database features two separate sections to store the information from two separate users of the same device. You can choose the user number (person who will be using the device) in the very first information screen you see after starting the program (Image 3). When you open SNOR app, it defaults to User #1 (red square that shows “1” in the upper right corner). In order to have a second user train with SNOR device without “mixing” the results of both users in the database, you have to select the appropriate user number before starting the session. Depending on who is going to use the device, select his/her personal number by pressing on the square in the upper right corner of the screen. This way the two databases will be separate for both users and each user will have the ability to track their own progress. To review the results of a training for a particular user, choose the user number who’s results you would like to see and press “HISTORY” button.
You can exit the app by pressing “EXIT” and confirming your choice. The tubes (straws) that come as a part of the package are single-use items.
Each tube is used once per each session, after which it should be thrown out. Do not reuse the same tube, because the saliva, which stays inside the tube, contains bacteria, which can cause infection.